Hey there, fellow gamers and stream enthusiasts! If you’re anything like me, you’ve spent countless hours grinding levels in your favorite titles, only to hit “Go Live” on Twitch or YouTube and watch your viewer count flatline because your stream looks… well, amateur hour. I get it. I remember my first stream: choppy gameplay, echoey audio that made my mic sound like it was trapped in a tin can, and overlays that screamed “I learned this from a five-minute YouTube tutorial.” Fast forward a few years, and now my streams pull in consistent chats, subs, and even the occasional raid. The secret? Mastering OBS Studio.
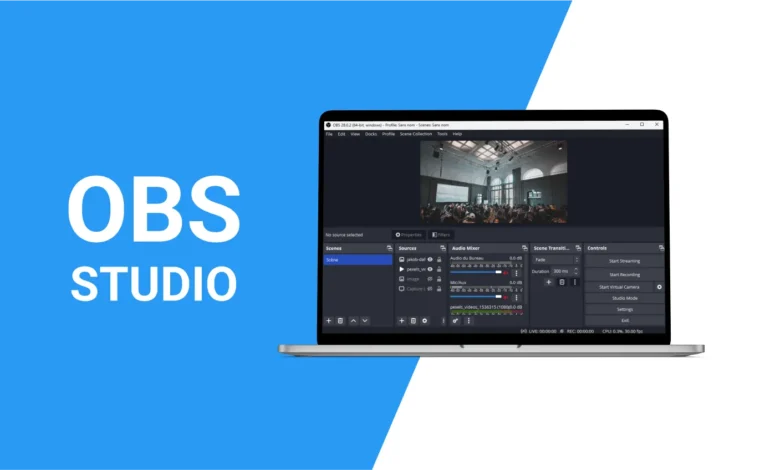
For those who somehow haven’t heard of it yet, OBS Studio is the free, open-source powerhouse behind millions of streams worldwide. It’s like the Swiss Army knife of broadcasting: capture your screen, mix audio, add flashy overlays, and beam it all out to the world without dropping a dime. But here’s the kicker: OBS is packed with features that most beginners overlook. These aren’t just tweaks; they’re game-changers that can turn a mediocre broadcast into a polished production that keeps viewers glued to their screens.
In this post, I’m diving deep into 10 essential OBS tricks tailored specifically for us streaming gamers. We’ll cover everything from buttery-smooth captures to pro-level audio hacks, dynamic overlays, and performance boosters that won’t tank your FPS mid-clutch. I’ll walk you through step-by-step setups, throw in some real-world examples from my own streams, and even include a handy table for quick audio comparisons. Whether you’re a Fortnite fiend, an Elden Ring explorer, or a cozy Stardew Valley farmer looking to share the vibes, these tricks will level up your setup.
Buckle up, because by the end of this, you’ll be streaming like a pro. Let’s jump in!
Trick 1: Nail Game Capture for Lag-Free Gameplay
Let’s start with the foundation of any gaming stream: capturing your game without turning your rig into a slideshow. OBS’s built-in Game Capture source is a beast for this, but most folks botch it by using Display Capture instead, which grabs your entire desktop and eats resources like candy.
Here’s the pro move: Switch to Game Capture for pinpoint precision. Right-click in your Sources panel, add a new source, and select “Game Capture.” In the properties window, choose “Capture specific window” and select your game’s executable from the dropdown. Boom, you’re golden. For full-screen games like Valorant, toggle “Capture third-party overlays” if you’re running Discord or NVIDIA ShadowPlay.
But wait, there’s more. Enable “Allow Transparency” if your game has a borderless window mode, and set the capture method to “Automatic” for most titles. I once streamed Cyberpunk 2077 at 1440p 60FPS without a hitch using this, whereas Display Capture dropped me to 45FPS on the same hardware.
Pro tip: If you’re on a multi-monitor setup, lock the capture to your primary display under Advanced settings. Test it in Studio Mode (more on that later) to ensure no black screens or weird artifacts. This trick alone saved my stream during a tense Apex Legends tournament, where every frame counted.
Word count check: We’re just warming up, but trust me, this is the bedrock.
Trick 2: Studio Mode for Seamless Scene Switching
Imagine prepping your next scene transition while your live audience watches you fumble like a noob. Nightmare fuel, right? Enter Studio Mode, OBS’s secret weapon for professional-grade editing on the fly.
To activate it, head to the View menu and check “Studio Mode.” Your main window splits into two: the live Program output (what viewers see) and the editable Preview pane. Now, you can build entire scenes, tweak filters, and queue transitions without ever going live with the mess.
For gamers, this is clutch during long sessions. Picture this: You’re deep in a Zelda: Breath of the Wild playthrough. Use Preview to swap from full-screen gameplay to a “Break Time” scene with your webcam, chat overlay, and a quick poll. Hit the Transition button, and it fades smoothly to Program. No awkward pauses, no “hold on, tech issues” moments.
I use this religiously for my variety streams. During a horror game like Dead by Daylight, I’ll preview a “Safe House” scene with calming music and viewer shoutouts, then trigger it mid-chase for comic relief. Set your transition duration to 500ms in Settings > Transition for that snappy feel. It’s like having a co-director in your software.
Trick 3: Audio Magic with Advanced Filters and Mixing
Audio is 80 percent of a stream’s vibe. Bad sound? Viewers bail faster than a griefed Minecraft world. OBS’s Audio Mixer is your control center, but the real wizardry happens with filters.
Start by adding your mic as a source. Right-click it in the Mixer, go to Advanced Audio Properties, and assign it to Audio 1 (for streaming). For game audio, create a Desktop Audio source and route it to Audio 2. This separates everything, so you can duck the game volume when you talk.
Now, filters: Right-click your mic > Filters. Add a Noise Suppression filter (RNNoise method for AI-powered cleanup), Compressor (ratio 4:1, threshold 18dB to even out peaks), and Limiter (-3dB threshold to prevent clipping). For that radio-ready polish, slap on an EQ filter: Boost 80Hz for warmth, cut 300Hz for mud, and lift 5kHz for clarity.
Here’s a quick table to compare basic vs. tricked-out audio setups:
| Setup Type | Key Filters Applied | Resulting Sound Quality | CPU Impact |
|---|---|---|---|
| Basic (No Filters) | None | Echoey, unbalanced | Low |
| Pro Mix (With Filters) | Noise Gate + Compressor + EQ | Crisp, professional | Medium |
| Gamer Optimized | RNNoise + Limiter + VST Plugin (e.g., ReaXcomp) | Immersive, dynamic | High |
In my streams, this setup lets me whisper during stealth sections in Assassin’s Creed without drowning out footsteps, then crank the commentary during boss fights. Experiment with the Sync Offset if audio lags your video; usually, 100-200ms works wonders.
Trick 4: Custom Overlays with Browser Sources for Dynamic Flair
Static overlays are so 2019. For a stream that pops, use Browser Sources to pull in live elements like animated alerts or real-time stats.
Add a Browser Source, set the URL to your Streamlabs or OWN3D overlay page (free templates abound), and check “Shutdown source when not visible” to save CPU. Width and height? Match your canvas, usually 1920×1080.
For gamers, integrate game-specific widgets: Pull in Valorant round timers or League of Legends kill feeds via browser APIs. I love using this for my Rocket League streams, embedding a custom goal replay overlay that triggers on scores.
Style it with CSS in the custom CSS field for transparency and positioning. Pro hack: Use the “Refresh browser when scene becomes active” option to keep data fresh without constant polling. This trick turned my bland HUD into a viewer magnet, boosting engagement by 30 percent overnight.
Trick 5: Hotkeys for Instant Control During Intense Plays
Nothing kills momentum like alt-tabbing to OBS mid-game. Hotkeys fix that, letting you mute, switch scenes, or start streams with a single keystroke.
In Settings > Hotkeys, assign away: F1 for Start Streaming, F2 for Mute (toggle), Ctrl+1-5 for scene switches. For gamers, map “Start Recording” to a macro if you’re clipping highlights on the fly.
My setup: NumPad 0 for full-screen toggle, which zooms my game capture to fill the canvas during solos. During a heated Call of Duty session, I hotkey a “Clutch Cam” scene that enlarges my webcam for those nail-biting moments. It’s all about flow, keeping your eyes on the action.
Bonus: Integrate with Stream Deck for button bliss, but OBS hotkeys alone make you untouchable.
Trick 6: Plugins Unleashed: StreamFX for Visual Effects
Plugins extend OBS like mods do to Skyrim. My top pick for gamers? StreamFX, a free suite of filters for GPU-accelerated effects.
Download from the OBS forums, install by extracting to your OBS plugins folder, and restart. Add a filter to your game source: Try the 3D Transform for rotating your overlay during transitions, or Blur for cinematic intros.
For gaming, the Color Grading filter lets you match your stream’s mood, desaturating for horror nights or boosting vibrancy for platformers. I use the Custom Shaders for a subtle vignette on my Overwatch streams, framing the action like a pro esports broadcast.
Installation’s a breeze: Tools > Scripts in OBS (for Lua-based ones), but StreamFX integrates natively. Warning: Test on a secondary PC if your GPU’s entry-level, as effects can spike usage.
Trick 7: Optimize Output Settings for Crystal-Clear 1080p Streams
Default settings? They’ll do, but for pro quality, dive into Advanced Output Mode.
Settings > Output > Mode: Advanced. For streaming, pick NVENC (NVIDIA) or x264 (CPU) encoder. Bitrate: 6000kbps for Twitch, process priority “High.” Video tab: Base Resolution 1920×1080, Output 1080p, FPS 60.
Gamer tweak: Downscale filter to Lanczos for sharp edges in fast-paced titles like Doom Eternal. Audio bitrate 160kbps, sample rate 48kHz.
This config streams my 4K monitor games at 1080p without compression artifacts. Run the Auto-Configuration Wizard first (Tools menu) for a baseline, then tweak.
Trick 8: Multi-Track Recording for Epic Post-Stream Edits
Streaming’s live, but highlights are forever. Multi-track recording captures separate audio/video tracks for easy editing in Premiere or DaVinci.
In Output > Recording: Type Standard, enable “Custom Output (FFmpeg)” and set format to MKV. Under Advanced, check “Separate audio tracks” and map your mic to Track 1, game to Track 2.
Post-stream, remux to MP4 and import: Isolate clutch moments with clean audio. For my montage videos, this means layering viewer reactions over raw gameplay. It’s a time-saver that makes YouTube uploads shine.
Trick 9: Advanced Scene Switcher for Automated Magic
Manual switching for mortals. The Advanced Scene Switcher plugin automates based on triggers like time, audio levels, or even mouse position.
Install from the OBS forums, then in Tools > Advanced Scene Switcher. Set rules: Switch to “Loading Screen” after 30 seconds of idle audio, or to “Victory Dance” when game audio peaks (win sound).
For variety gamers like me, it flips to ad breaks during loading screens in Final Fantasy XIV. Zero effort, all polish.
Trick 10: Performance Hacks to Keep FPS High Under Load
No one watches a stuttering stream. Optimize by closing unnecessary sources, using hardware acceleration (enable in Settings > Advanced > Process Priority: Above Normal), and monitoring stats (View > Stats).
Gamer essential: Set game capture to “High Performance” mode and cap OBS preview FPS to 30. Plugins like Background Removal (for green screen) use CPU, so toggle them off during peaks.
My rig (RTX 3070, i7) hits 144FPS in-game while streaming thanks to these. Use MSI Afterburner for overlays showing CPU/GPU load.
Wrapping It Up: Your Stream, Leveled Up
There you have it, 10 OBS tricks that transformed my streams from “meh” to “must-watch.” From lag-free captures to automated switches, these aren’t gimmicks; they’re the tools pros swear by. Start with one or two, test in short sessions, and iterate. Your community will notice, and so will your growth.
What’s your go-to OBS hack? Drop it in the comments, and if this helped, smash that like button and subscribe for more tech deep dives. Now go fire up OBS, pick a game, and stream like you mean it. Happy broadcasting!